C PROGRAMING SOFTWARE DOWNLOAD | VS CODE | CODEBLOCKS |ATOM | NETBEANS | TOP IDEs FOR C OR C++ | MOST POPULAR COMPILER |

Heya! A warm welcome to all the programmers and readers.
Before we go ahead and read the below article, I’m sure the first computer language which you all would have explored would be “C”, right?
In this digital era, nothing is possible without programming. From smartphones in our pocket to self-driving cars, everything needs programming. The cursor of the mouse which you are rolling needs programming too! That’s quite an interesting fact. Lol to myself.
Let’s start with the basics :-
Knowledge of programming allows programmers to communicate with computers with their machine language.
We all know, there are several programming languages that anyone can learn. However, ‘C’ programming has always been a favorite bull’s eye to the programming archers.
How would it sound if I tell you that this is one of the oldest and important programming languages?
Clear the myth this isn’t. The evolution of programming started with computer languages named Fortran and Cobol in the year ranging from 1951 – 1960. And ‘C’ programming was discovered in the year 1972 by Dennis M. Ritchie who was an American computer scientist.
Let’s know more about C. Well, C is a building block of many other programming languages that programmers use today.
Contrary to this, C++ (the extended version of C) is similar to C but has more features. You can refer to C as a subset of C++ making it equally important for developers. Both languages have the same syntax and code structure. If you want to know more about 'C' then yo should go through this :- https://computer-languages-at-ease-4-u.blogspot.com/2022/04/c-programing-c-c-language-computer.html .
I have covered everything about C and C++ in the above blog . You can check that too for better understanding of C language .
Considering this, we have covered the 10 best IDEs (Integrated Development Environment) for C or C++ programming language in this article. Points 5 and 6 being my personal favorite.
Best IDEs for C or C++ :-
It is an open-source code editor developed by Microsoft for Windows, Linux and Mac OS. Visual Studio Code is based on an Electron framework. According to a survey done in 2018 by Stack Overflow, it was ranked the most popular developer environment tool among others. Furthermore, this IDE is also customizable which lets programmers change the theme, keyword shortcuts and preferences.

HOW TO DOWNLOAD :-
Download Visual Studio Code:
You can download Visual Studio code from URL "https://code.visualstudio.com/download" by selecting the right platform:

You can click any of the icons mentioned above, depending on the operating system for which you are planning to download the visual studio code editor.
How to install Visual Studio Code on macOS?
Follow the below steps*(shown in gif file and mentioned in bullet points)* to install the VS Code on macOS:
- Download Visual Studio Code for macOS.
- After clicking on the Mac option on the download site, it will download a zip file, as shown below:
- Double-click on the downloaded zip to expand the contents. It will give a file, as shown below:
- Drag "Visual Studio Code.app" to the "Applications" folder, so as it available in the "Launchpad."
- Double click on the "Visual Studio Code" to open.
- Add VS Code to your Dock by right-clicking on the icon to bring up the context menu and choosing Options => Keep in Dock.

How to Install Visual Studio Code on Windows?
Firstly, download the Visual Studio Code installer for Windows. Once it is downloaded, run the installer (VSCodeUserSetup-{version}.exe). It will only take a minute.
Secondly, accept the agreement and click on next.

Thirdly, click on "create a desktop icon" so that it can be accessed from desktop and click on Next.

After that, click on the install button.

Finally, after installation completes, click on the finish button, and the visual studio code will get open.

By default, VS Code installs under C:\users{username}\AppData\Local\Programs\Microsoft VS Code.

Hence your installation is complete . Now you just need to download C/C++ extensions in vs code and then you are all set to use VS code .
Programming Languages Supported: C, C++, C#, Java, JavaScript, COBOL, Perl, PHP, Python & others .
2. NetBeans
.png)
HOW TO DOWNLOAD :-
Installing the C compiler
Note: If you use Linux, you don't have to install a compiler.
First of all, we'll download a compiler. It's a computer program (or a set of computer programs) which transforms a source code written using a programming language (the C language in our case) to a lower computer language which the computer processor is able to run.
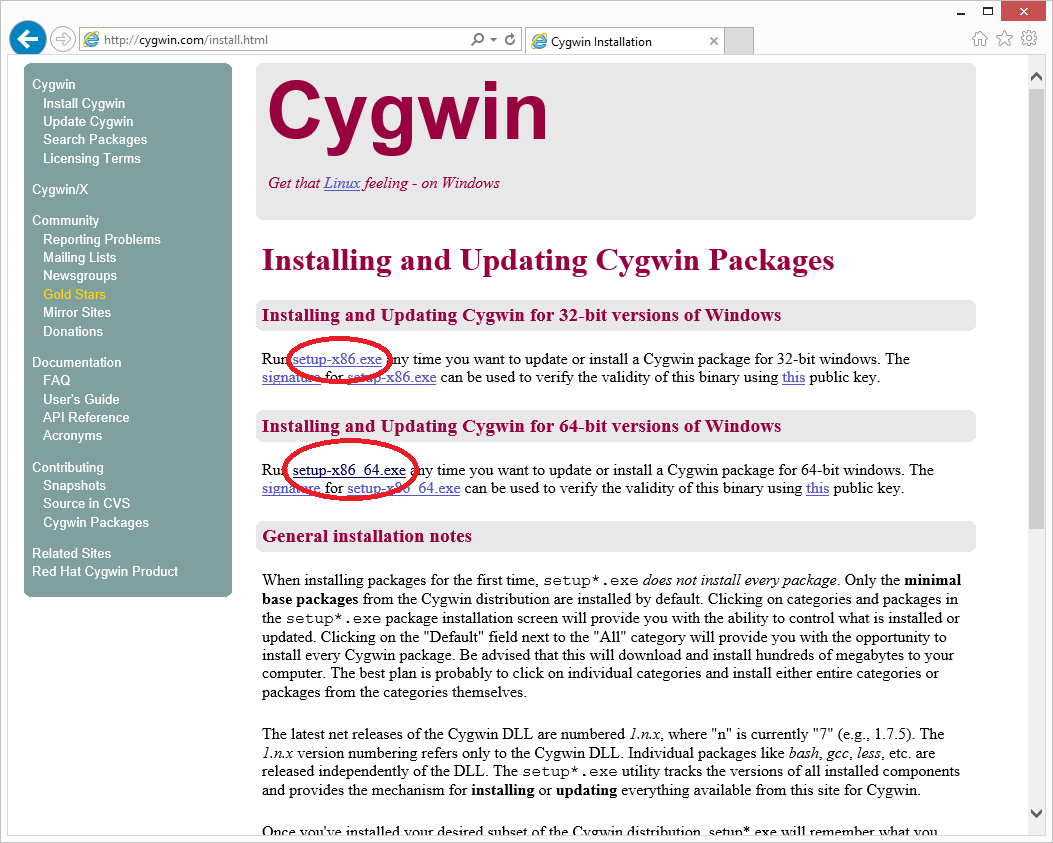
There are various C language compilers, we'll use Cygwin GCC (if you use another one, we cannot guarantee that all of the examples will work for you). Now, go to http://cygwin.com/install.html and click on "setup-x86.exe" or "setup-x86_64.exe" if you have a 64-bit version of Windows.
Once downloaded, the "Cygwin Setup" will execute and you'll just keep pressing the "Next" button until you see this window:
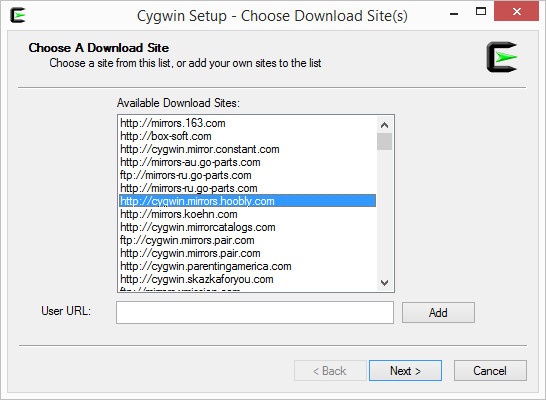
Here we choose the location we want to download the program from. We can choose any address we want, however, it's the best to choose an area which is close to you. I'm going to use http://cygiwn.mirrorcatalogs.com. Once you pick an address, click the "Next" button.
Note: Some of the addresses could potentially not work.
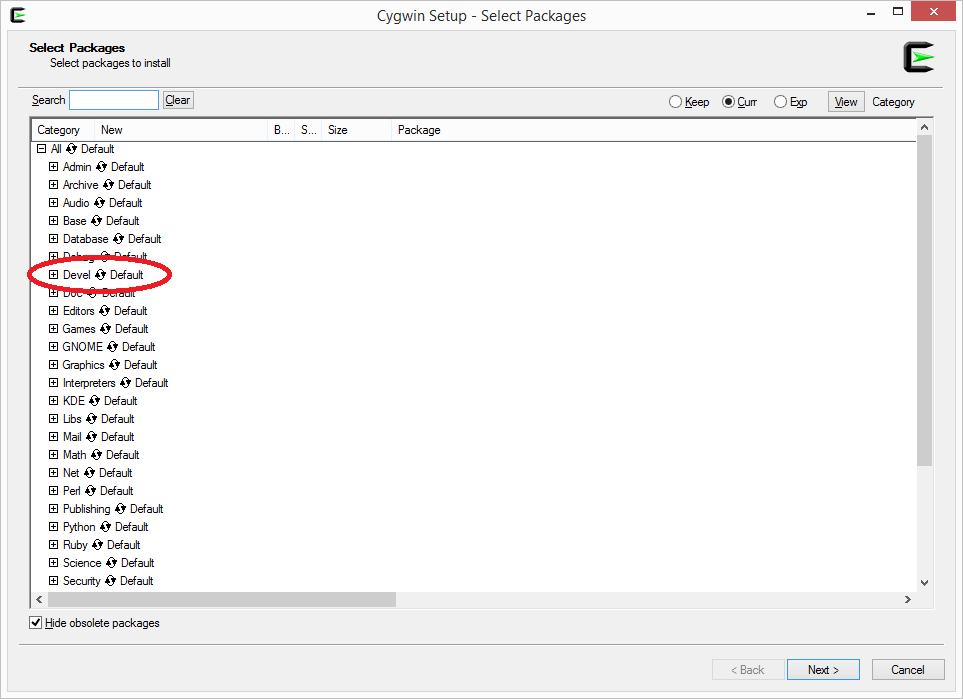
Another window will then appear, this time to choose the packages that are to be installed. We'll collapse the "Devel" package and click on the little "plus" next to it.
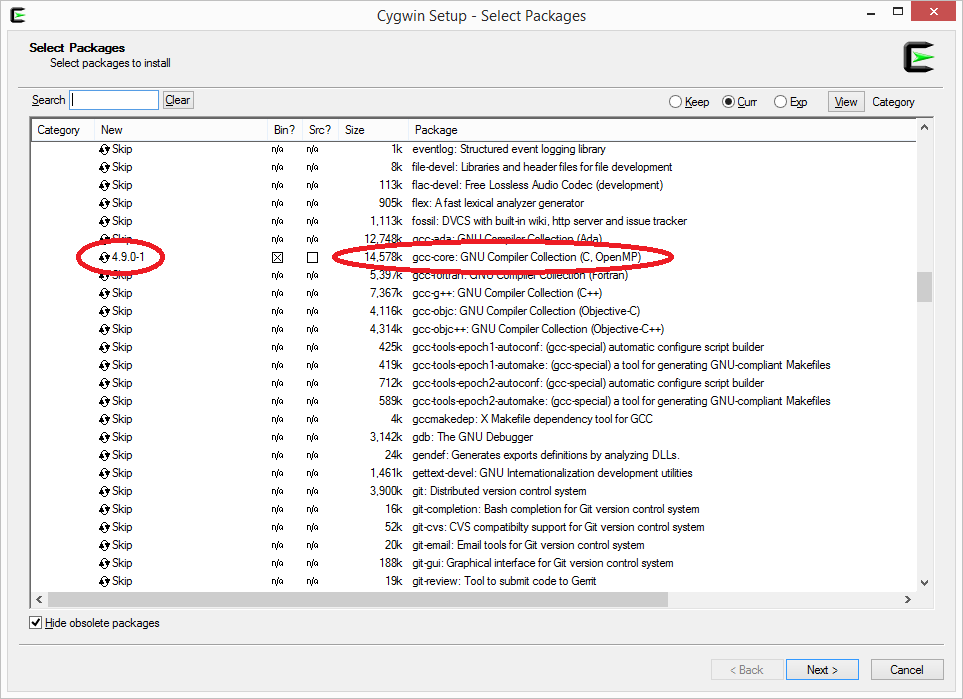
Next, find the "gcc-core" package and click on "Skip" next to it.
Note: The numbers which have popped up indicate the compiler version, so choose the latest one (the greatest number).
Then look for the "make" package and click on it's "Skip" as well so it can be installed.
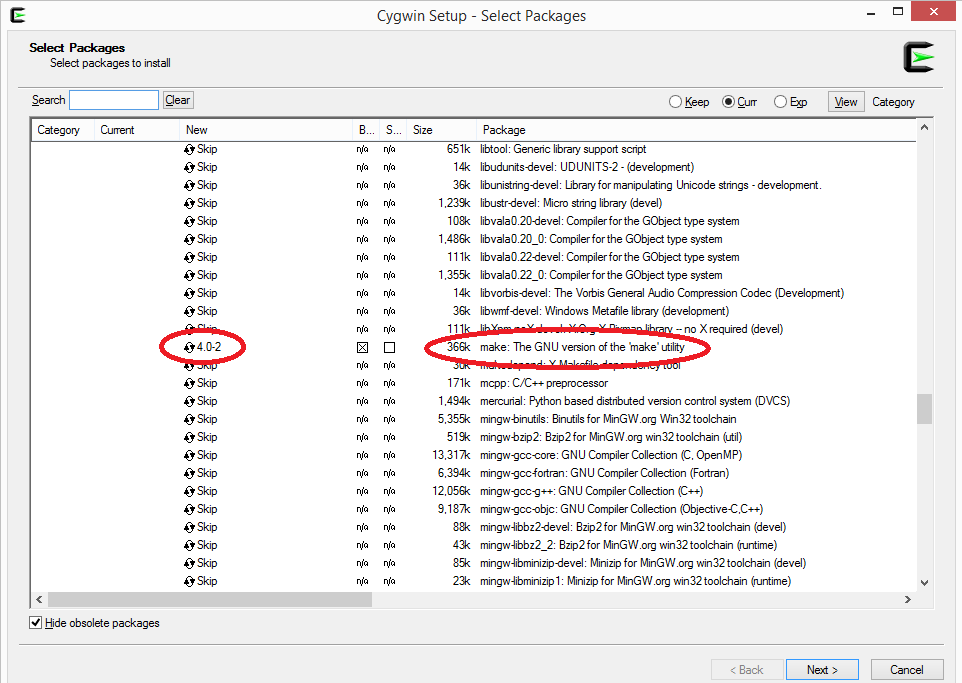
Now, just click the "Next" button and then the "Finish" button once the installation is done.
Installing the IDE
First, we'll need to download JDK (Java Development Kit) which is a set of tools needed for Java development. You'll find it at http://www.oracle.com/…s/index.html. Select that you agree with the license and select the right JDK for your operating system (which will likely be Windows 64 or 32, depending on your PC). The installation is trivial, just keep clicking on the Next button. The installation might also run the installation for some other components, if this is the case, just install them as well.
IDE stands for Integrated Development Environment. In a nutshell, it's an application in which we write source code, and then use it to run, test and debug the application.
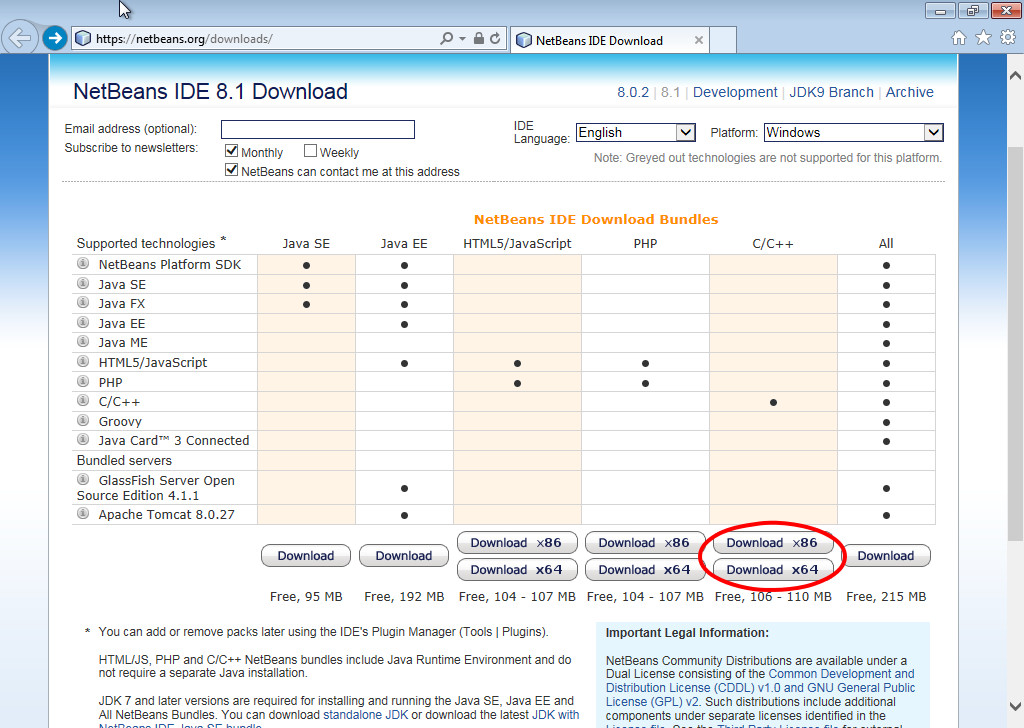
For this course (and all the other C courses at ICT.social) we'll use NetBeans. Let's open https://netbeans.org/downloads/ and click on the download button under the "C/C++" section.
Note: If you plan on programming in other languages, e.g. Java, download the "all" NetBeans bundle.
Install it (just keep clicking "Next") and run it.
Backup and version control
Programmers usually need a tool that will provide version control and backup of their work. We can't rely on the fact that we could simply save the program because we're humans and humans make mistakes. When you lose a few days' or even a few weeks' work, it can be really demotivating. It's good to think ahead from the get-go. I highly recommend using Dropbox, which is extremely simple, and automatically stores multiple versions of your files, which makes it possible to revert to previous versions of the project. On top of that, it also synchronizes with a web repository. Even if you've accidentally deleted your project, overwrote it, somebody stole your laptop or your hard drive accidentally collapsed, your data will remain safe. Dropbox also allows you to share projects with other developers.
You can also use a tool called GIT for the same purposes, but its configuration would require the while article. Dropbox is perfect for our current intents and purposes.
Hello world
Let's test that our compiler has been successfully installed. As tradition instructs, we'll make the first program most people make when they learn a new language - Hello World. This is a program that displays "Hello world" or some similar text.
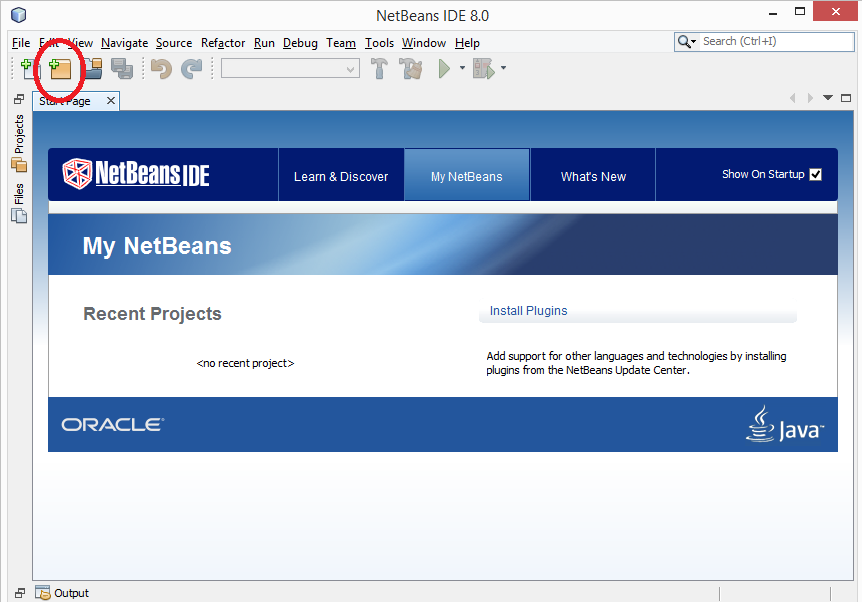
Let's open NetBeans (the icon should be on your desktop). Once it starts, click on the brown cube icon at the top left corner (Create a new project).
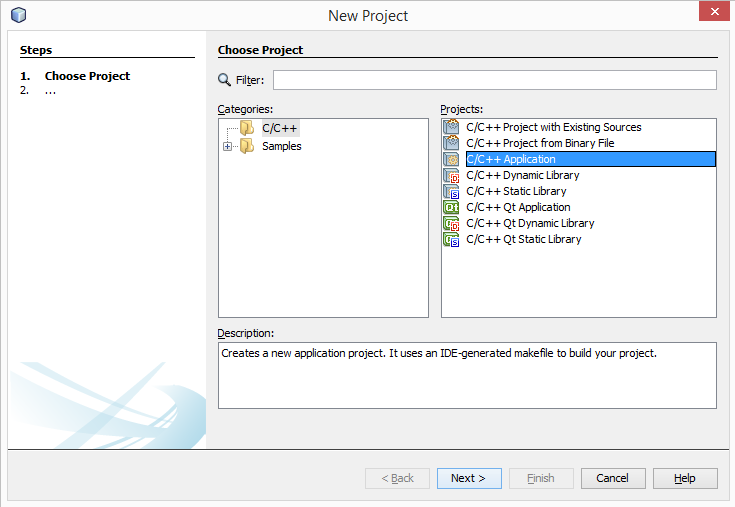
A new window will show up. We'll click on the "C/C++ Application" and then on "Next >".
A new window will show up. We'll change the project name to "HelloWorld". There is a drop-down menu next to the main. Open it and choose C. Your form should look like this:
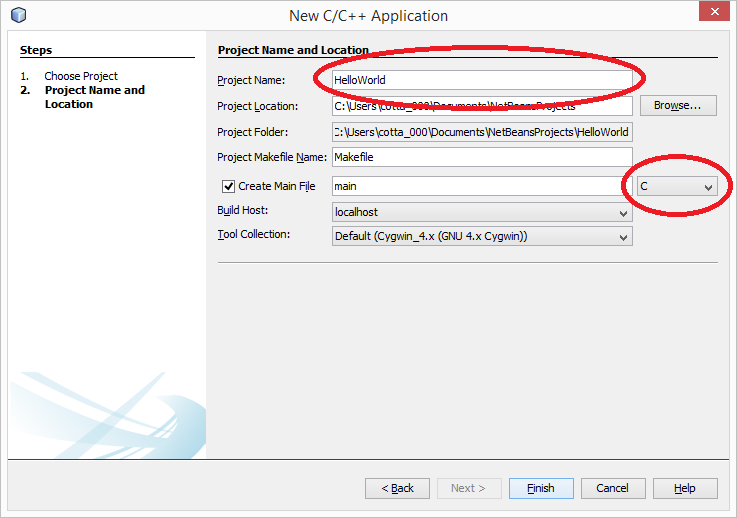
Once you're sure it's been properly filled, click "Finish".
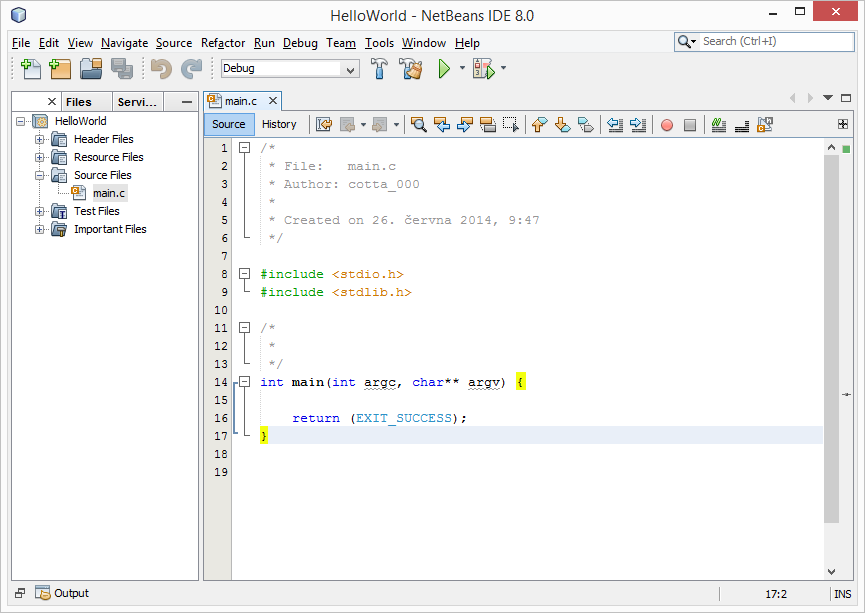
We're interested mainly in the middle window in which NetBeans will generate some source code. It may be a surprise to some of you that we are not starting out with an empty window, but then again that is exactly what a template is (easily modifiable preset code)! We'll keep it simple for now, everything will be explained throughout the courses.
The gray text between slashes and asterisks are comments. The compiler doesn't mind them, they serve mainly as notes for programmers. Here, they carry the information about who created the program and when.
Our focus should be mainly on the lines which start with #include. There, we declare which libraries we'll be using. A library can be understood as a package of functions. stdio.h contains functions for working with the console and files (it stands for Standard input/output). stdlib.h provides basic functions for working with the C language (it stands for the Standard library).
C programs always start in the main() function. Its body is closed by curly brackets. We can see the return command inside the main() function, which returns the standard output code when the program terminates. This is the way we tell the operating system that the program has finished successfully.
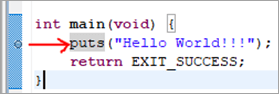
Let's add code into the main() function just below the line containing:
int main(int argc, char** argv) {
Add the following line:
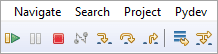
It'll write some text to the console once the program starts. Once you're done, you may run your program using the green play button or using the F6 key:
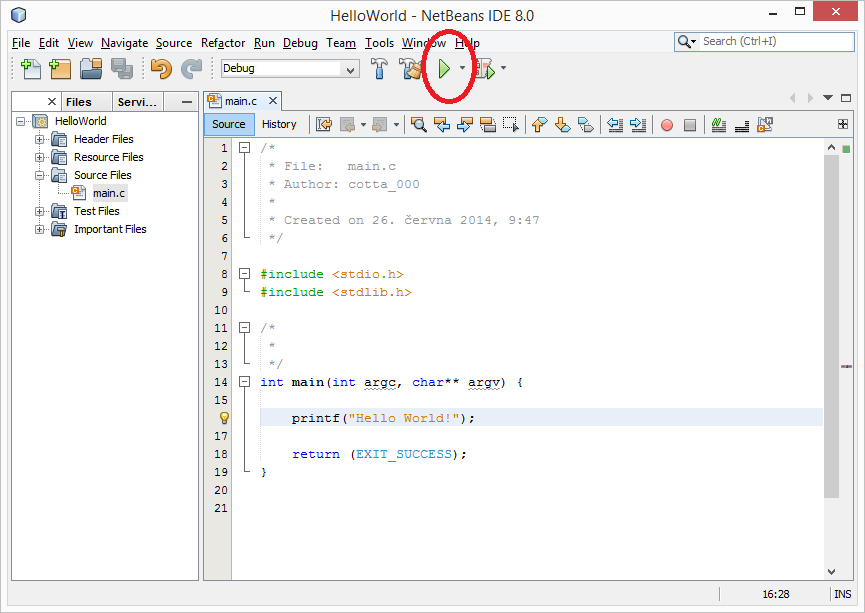
The message "Hello World!" will then be written to the console through our program.
If this isn't the case, make sure you set everything up correctly. If the panel with the program's output didn't show up, open it from the application menu using Window -> Output.
3. Eclipse

HOW TO DOWNLOAD :-
Install And Configure Eclipse For C++
In order to install and configure Eclipse IDE for C/C++ development, firstly, we need to make sure that we have an appropriate GCC compiler on our machine.
Please follow the following steps to install and configure Eclipse IDE for C/C++.
Step 1: Install GCC Compiler
Eclipse CDT uses C/C++ Compiler. Hence before we can start using Eclipse CDT for C/C++ development, we need to have a proper GCC compiler on our system. We can either have ‘MinGW’ or ‘Cygwin’ compiler on our machine that will be used by eclipse.
We will not go into the details of the installation of these compilers, but we will provide the appropriate links that will be useful to our readers.
=> Click here to install MinGW Compiler - https://sourceforge.net/projects/mingw-w64/
=> Click here to install Cygwin Compiler - https://cygwin.com/install.html
Step 2: Install Eclipse C/C++ Development Tool (CDT)
There are two ways of installing Eclipse CDT based on whether you already have an Eclipse IDE on your system or not, depending on whether you have previously installed an Eclipse:
If you already have Eclipse JDT (Eclipse for Java) or any other Eclipse environment on your system, then you can add a CDT plug-in to this environment.
Given below are the steps to add CDT plug-in to the existing Eclipse environment:
#1) Launch Eclipse.exe
When you launch Eclipse for the first time you have to create a workspace that will hold all your projects. After that every time you open Eclipse IDE, you will be shown a dialog to select the workspace.

In the above dialog, you can either create a new workspace or select an existing workspace, click ok and the IDE will open.
#2) Click Help =>Install New Software. In the “Available Software” dialog, enter “Kepler – http://download.eclipse.org/releases/kepler” (or Juno for Eclipse 4.2; or Helios for Eclipse 3.7) in the “Work With” field or pull down the dropdown menu and select the above link.
#3) In the “Name” field, expand “Programming Language” and check the option “C/C++ Development Tools”.
#4) Click Next => Finish.
This sequence of steps is shown in the below screenshot:

Once the plug-in is installed, we are ready to begin C/C++ development using Eclipse IDE.
If there is no Eclipse IDE present on the system, then we can directly install Eclipse CDT by downloading the Eclipse CDT package.
There is no installation sequence as such, you just have to unzip the contents of the downloaded package and then run “Eclipse.exe” and you are ready for C/C++ development using the Eclipse IDE.
Step 3: Configuring Eclipse IDE
It is not required to specifically do any configuration for Eclipse CDT as long as you have MinGW or Cygwin binaries updated in the PATH environment variable.
CDT searches the PATH and discovers the C/C++ Compilers on its own.
Now you are ready to use the Eclipse.
C++ Development Using Eclipse IDE
To test the environment you just configured, open Eclipse.exe.
Choose File => New => C++ Project and the below screen will appear.

Here you can specify the name of the project. You can select an Empty project or a sample “Hello World” application project. The compilers present on your system are listed under “ToolChains”. You can select the appropriate compiler and then click Next.
Another way to select the compiler and set other properties for the just created project is to right-click on the project name in the project explorer and select “Properties”.
You will be presented with the following screen.

In this dialog, we can set various properties for the selected project.
Once the project is ready, we can add a file with the .cpp extension and write a code. Once you have written the desired code, it’s time to compile and build the code.
Note that you can have more than one code file in the project. You can also create a C++ class inside the project.
Build And Execute Projects In Eclipse
We can build the project by right-clicking the project name in the Project Explorer and select “Build Project”.
Once the build is successful, run or execute the project. For this, right-click the project name on the Project Explorer and click “Run as”. Then select “Local C/C++ Application”. This runs your application.
Debugging An Application In Eclipse
If you get the desired output when you run the project, then you can say that the project is successful. But if you don’t get the desired results, then you might have to debug your application.
Let’s see how to debug an application in Eclipse.
To debug a project, we have to perform the following steps:
#1) Set a Breakpoint
By setting up a breakpoint, you can suspend the execution of the program. This will allow you to examine the program step by step and also watch the intermediate values of variables and flow of execution so that you can find out the problem in your code.
It is normally a good practice to set the breakpoint in the main function as it’s the starting point for a C++ program. To set a breakpoint, you can double click on the left panel of the code file against the line of code for which you want a breakpoint.
Another way is to click “Ctrl+Shift+B” by placing the cursor on the line of code for which the breakpoint is needed.
The red arrow shows the line for which the breakpoint is set. It is denoted by a circle on the left-hand pane.
#2) Start Eclipse Debugger
Once the breakpoint is set, you can start debugger by right-clicking (or Run option in the menu) the project name and select “Debug As=> Local C/C++ Application”. On doing this your execution will pause at the line at which the breakpoint is set.
#3) Step Over and Watch Variables and Output
After starting the debug, you can “Step Over” each line of code and examine the variable values by hovering your mouse over that variable.
This process of stepping through each line of code is the ultimate method to debug your program.
#4) Debug operations => Run-to-line resume, terminate
These are all the operations that you can perform with debugging. Run-to-line will continue the program execution up to the line where the cursor is placed.
Resume continues the program execution up to the next breakpoint or till the end of the program. Terminate -terminates the debugging session.
The below screenshot shows the debug toolbar and the operations that we discussed.
#5) Switch back to the development perspective.
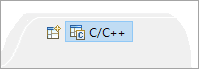
Click the C/C++ icon shown in the above screenshot to switch back to the project for further programming.
Readers can explore the other debugger features like step-into (wherein we can go inside any function and debug it), modify the value of the variable being watched, etc.
4. Atom

It is one of the highly configurable text editors which is free for personal and commercial developments. It was designed and developed by GitHub and has a very large community. A multitude of plugins are available for this editor which extends its features and makes it more customizable. It also supports OS X, Windows and Linux, and has a very simple interface to work on.
Key Benefits:
- Cross-platform support
- Smart autocompletion
- Package manager
- Plugins support
- Multiple panes
- Option to find and replace text
- Supports command palette
Programming Languages Supported: C/C++, CSS, HTML, JavaScript, PHP, Python, Ruby and others .
HOW TO DOWNLOAD :-
Installing on Windows
To install Atom on Windows, head over to atom.io, where you'll find a yellow Download button. Download the file, which is likely called AtomSetup-x64.exe, and run it. There are no options; the installer simply installs Atom for the current user, closes, and launches Atom. The first time Atom runs, it adds itself to the system path for the current user. That way you can launch Atom from the command prompt.
Below is what Atom looks like the first time it launches; notice there's a prompt at the top regarding Atom being allowed to open certain URIs. We recommend clicking No, Never, and only click any other options after you've read the documentation regarding this feature. (We will not be using this feature here at ProgrammableWeb.)
Now go ahead and close Atom. In the next section, we demonstrate how to open it from the command prompt.

Testing it Out
Now you can test your installation of Atom. Open up a Windows command prompt, and simply type:
atom .The "." tells Atom to launch in the current directory. If you like, you can omit it and Atom will launch in a default directory or the directory you last ran it in. Or you can specify a complete path, e.g.:
atom \Users\jeffc\developAtom will launch and this time will look like the following:

The area on the left is a tree view of your current project's directory; you can single-click files to open a preview in the editor (during which the file's tab on the right side will be in italics) and you can double-click to fully-open a file for editing. While in preview mode, if you begin to edit the file, it will open fully. Or if you single-click another file, the previous file you were previewing will close and this other file will open in preview mode. Whereas you can have multiple tabs open on the right side for editing multiple files simultaneously, there is only one tab for previewing. In other words, you can only preview one file at a time.
The right-hand portion of the window is the editor area, which can be divided into individual editor panes. Each pane can hold any number of files, with each one showing up as a tab at the top. In the above image, you can see the editor area is divided into two panes. You can drag the editor tabs between the panes; if you drag them all into a single pane, the empty panes close. You can close the tabs by clicking the X in the upper right of each tab. (The first time you start Atom, one tab is a window asking for Telemetry Consent, whereby you can choose whether to send debug data to the Atom team.)
You can also collapse the project tree pane; when you float your mouse over the right edge of that pane, the center of the right-edge will gain an icon that looks like this:

Click the icon, and the pane will collapse to the left. Now when you float your mouse over the left edge of the Atom window, you'll see the same icon in reverse; click it to re-open the pane. You can also move the project pane to the right side of the window by dragging its title to the middle of the right side of the Atom window. When you do so, you can now collapse the pane to the right instead of the left by hovering over the left edge of the pane. Various packages will add different panes to Atom, and you can drag and collapse them as well.
You can open additional Atom windows by clicking the File menu -> Open Folder. When you choose a folder, an entirely new Atom application window will open.
Customizing Atom
Here at ProgrammableWeb, we're building a large set of tutorials that will all use a common set of configurations. To make this as simple as possible, we're going to have a root development directory under which you can save your projects. Because of the number of projects, we suggest opening your code editor so that it points to the current project directory (whatever project you're working on at the time), rather than the root of all the projects. We're also going to use a standard set of configurations and plugins for the editors.
Atom has a huge array of options. You can access Atom's settings by any of the following methods:
- Click File Menu -> Preferences
- Press Ctrl + ,
You should see the settings open in the editor area, as shown here:

The settings page lives inside the editor area, and as such has a tab at the top. To close the settings page, simply click the close button on the tab.
You can also customize Atom through code by providing a CoffeeScript file in the .atom directory found off of your user directory, which is usually at C:\Users\<username>. In this file, you can provide custom startup code and even call customization packages that you write yourself. Here at ProgrammableWeb, we won't be doing customization through code, but you can learn more about it here. You can then learn more about what the Atom team calls "Hacking Atom." However, we will be adding some community-supplied packages, which we discuss below.
In addition to the Settings page, Atom provides access to many settings through a command palette; a small window in which you can type commands to control Atom. You can access the command palette either by:
- Click the View Menu -> Toggle Command Palette
- Press Ctrl+Shift+P
The command palette will open showing a small text area where you can type, with a list of commands in a scrolling list, as shown below. The official documentation makes use of the command palette from time to time; we don't use it much in our initial setups.

Here are some basic settings we recommend.
Tabs vs Spaces. Indenting sub-sections of code such as the internals of an if-then-else statement or a do-while loop is an important habit for ease of readability. Not just for you, but for others that may have to view your code later. Like other code editors, Atom has an indentation feature. Although this is a hotly debated topic, we're going to set our indentations to spaces instead of tabs for one simple reason: Spaces work better for copying and pasting code from our web pages into the editors. (You are welcome to reformat to tabs afterward if you prefer.) We're going to use four spaces to allow for easier reading of our code.
Language caveat: Unlike most other languages, Python relies on indentation levels and is picky about consistency between spaces and tabs. If you choose to convert any python code from spaces to tabs, you must make sure you do it for the entire file. Otherwise, you'll get errors as soon as you run the program.
To set the indentation to spaces, open the Settings page and click the Editor button, which is on the left of the Settings tab, second from the top. In the settings, scroll all the way to the bottom and near there you'll see Tab Length and Tab Type. Set Tab Length to 4. Set Tab Type to Soft (which means spaces; Hard means tab characters). Here's a screen capture:

We encourage you to scroll through the available settings to configure the editor to your liking.
Fonts and Sizes. This is up to you, as we all have a different vision and visual needs. Atom lets you choose the fonts and sizes you prefer. Unfortunately, the font family name is one area where Atom isn't particularly user-friendly because it uses HTML/ CSS syntax for font family names. HTML/CSS font families are typically lists of font names surrounded by single quotes (when the font name has spaces), with commas between the font names.
The setting is called Font Family and it's in the Editor section of the settings. There's no dropdown list or picker of any kind. You just have to know what fonts are available on your system, and you can type them in here. You can explore what fonts are installed on your system by clicking the Task Bar and in the search box type "font" and choose "Font Settings" in the suggestions; the Fonts window will open listing the fonts you have installed on your computer.
The size is more straightforward. Under Font Size simply type the size of the font you want in the editor.
You can also set a zoom level using hotkeys; this level applies only to the editor area. Try this: With a file open, hold down Ctrl and type a + key, which might require pressing Shift depending on which + key you use. You'll see the editor text increase inside. Reverse it by pressing Ctrl and the minus key.
Recommended Packages
Atom comes with a large number of extensions called packages. Beyond that, you can install any number of the 8000+ packages built by the Atom team and the community. You can see what packages you have installed by opening Settings and clicking on Packages, as shown here:

You can search for and install new packages by opening Settings and clicking the "Install" button, as shown here:

Then you can search for packages in the textbox near the top. After you search, you can install a package by clicking the "Install" package next to its name. If a package is already installed, the "Install" button will be replaced by a "Disable" button. Each package has a unique name that you can search for.
Many of the parts built into Atom are actually custom packages. For example, the Project tree view on the left is a package, and you can remove it and replace it with one from the community that might have different features you prefer. You can find these by searching the packages for "tree."
You can also search for packages on the main Atom website here. You can optionally download the code for any package and install it manually; however, we recommend installing from within the editor itself.
Below is a list of packages we recommend you use based on your preferred languages. To locate each package, simply search for the name we're including with each, shown in bold. Note, however, that many language packages are included by default when you install Atom using the processes we described above.
Important Note: We have found that there are many packages that show up in search results that are no longer maintained, and unfortunately the Atom team isn't removing these. Be careful with such packages. Always check a package's status by clicking on the " Repo" link on the package's page, which will usually take you to a GitHub page. Look at the code listed on the GitHub page and note the dates. If you see dates from a few days ago, then it's a good sign the package is maintained. If the dates are over two or three years ago, it's probably not maintained. You can also click on the Issues link on the GitHub page and see if issues are not being fixed and if users are saying the package does not Function anymore.
Here's a list of several languages that have packages already installed by default, along with the name of the package. You should not need to install these, but we're listing them here just in case. Most of these provide basic syntax highlighting:
C/C++: language-c
C#: language-csharp
Go: language-go
Java: language-java
JavaScript: language-javascript
Objective C: language-objective-c
Perl: language-perl
PHP: language-php
Python: language-python
Ruby: language-ruby and language-ruby-on-rails are both installed by default.
Rust: language-rust-bundled
SQL: language-sql
TypeScript: language-typescript (but see our note below; we recommend a different one).
Here are some special notes on some of these languages.
C#: Atom provides basic C# syntax highlighting through the default supplied language-csharp plugin. However, that if you're a professional C# programmer, we suggest you consider Visual Studio Code for your editor, as it supplies excellent Integration with the C# runtime, including debugging.
Node.js and JavaScript: By default, Atom has excellent JavaScript syntax highlighting. The community has supplied several node.js packages; however, many of the more useful ones (such as integration with the node.js debugger) are not actively maintained and some don't even function anymore. By default Atom ships with the language-javascript and language- JSON packages. We don't recommend any others.
TypeScript: The community has built an excellent TypeScript package that is actively maintained, currently with over 1.7 million downloads. Search the packages for atom-typescript. You might consider replacing the default one, language-typescript, with atom-typescript.
5. Code::Blocks
How to Install CodeBlocks 13.12
Step 1: Download
Goto http://www.codeblocks.org/downloads. Click "Download the binary release". Select your operating platform (e.g., Windows 2000/XP/Vista/7). Download the installer with GCC Compiler, e.g., codeblocks-13.12mingw-setup.exe (98 MB) (which includes MinGW's GNU GCC compiler and GNU GDB debugger).
Step 2: Install
Run the downloaded installer. Accept the default options.
Verify the Compiler's and Debugger's Path: (For CodeBlocks 13.12 For Windows) Goto "Settings" menu ⇒ "Compiler..." ⇒ In "Selected Compiler", choose "GNU GCC Compiler" ⇒ Select tab "Toolchain Executables" ⇒ Check the "Compiler's Installation Directory". It shall be set to the "MinGW" sub-directory of the CodeBlocks installation directory, for example, suppose that CodeBlocks is installed in "c:\Program Files\codeblocks", set it to "c:\Program Files\codeblocks\MinGW".
Similarly, check the debugger's path. Goto "Settings" menu ⇒ "Debugger..." ⇒ Expand "GDB/CDB debugger" ⇒ Select "Default" ⇒ In "Executable path", provide the full-path name of "gdb.exe", for example, "c:\Program Files\codeblocks\MinGW\bin\gdb.exe".
Notes For CodeBlocks 13.12 For Windows (Jan 2014)
I encountered problem running debugger with CodeBlocks 13.12 bundled with MinGW (gcc v4.7.1 and gdb 7.5).
I resolved by installing the latast MinGW (gcc 4.8.1, gdb 7.6.1) separately (See "How to install MinGW"), and configured the compiler's and debugger's path to the installed MinGW as in the above step.
Alternatively, consider using Eclipse or Netbeans with Cygwin or MinGW GNU GCC compiler.
2. Writing C/C++ Programs in CodeBlocks
Read:
- CodeBlocks' Wiki @ http://wiki.codeblocks.org/index.php?title=Main_Page, in particular, "Creating a new project" and "Debug my Program".
Writing Toy Programs (without Creating a Project)
To write toy programs (such as few-line simple programming exercises):
- File ⇒ New ⇒ Empty File.
- Enter (copy and paste) the following codes:
// First C++ program to say Hello
#include <iostream>
using namespace std;

int main() {
   cout << "Hello, world!" << endl;
   return 0;
}
Save the file as "Hello.cpp" in your project directory (e.g., "d:\project"). - Build (Compile and Link): Select "Build" menu ⇒ Build (Ctrl-F9).
- Run: Select "Build" menu ⇒ Run (Ctrl-F10).
The drawback is you cannot debug program without creating a project.
6. CodeLite
Another good IDE for C or C++ programming used by the myriad of programmers. It is an open-source software that can run on all major platforms including Windows, Linux and OS X. It provides great support for compilers and also allows users to know more about the errors by just clicking on it.
Key Benefits:
- Spell Checker
- Word Completion
- Clang Based Code Completion Engine
- JavaScript, PHP code completion
- Graphical Diff Utility
- Valgrind Support
- Git and Svn plugins
- Database Explorer
Programming Languages Supported: C, C++, PHP, and others .

HOW TO DOWNLOAD :-


7. CodeWarrior

1. Download CodeWarrior 10 Evaluation Version (Eclipse, Windows-hosted)
To Program your microcontroller you will need to set up the CodeWarrior Integrated Development Environment. CodeWarrior is available on the Freescale.com Website.
Method 1: Direct Link
direct download link (Caution - link may not be up to date)
Method 2: Navigate to the Download Link
From Freescale.com click on:
- "Design Resources" tab at the top of the page,
- then navigate to "Software and Tools",
- and then to "Codewarrior Devleopment Tools"
- Click on the "Download CodeWarrior now link"
- Click on the Download Evaluation Versions link"
- Within this page, use your browser "find" feature (Typically CTRL-F) to search for the text string "Kinetis."
- Click the "download" button next to "Evaluation: CodeWarrior for Microcontrollers(Eclipse, Windows-hosted) version". and save it to your computer.
2. Install CodeWarrior
To install CodeWarrior Development Studio for Microcontrollers v10, double-click the installation
package and a wizard will guide you through the installation process.
Installation Notes:
Are you using Windows Vista or Windows 7?
1. The CodeWarrior installer should be run using the ‘Run as administrator’ option. CodeWarrior service
packs are installed with the Eclipse Updater. The updater should also be run with this option. To start
the Eclipse Updater select ‘Window > Install new software’ in the menu.
2. Eclipse needs read/write access to the installation folder. Make sure the eclipse installation folder has
the appropriate permissions for all users.
3. Make sure your project workspace has read and write permissions
Evaluation Edition User:
If you are installing the Evaluation Edition, the Evaluation license is automatically installed with your
product and you do not need to register it. This license allows you to develop projects as
Professional Edition within the 30-day evaluation period. After 30 days, the license works as Special
Edition license (free permanent, but feature limited) which supports unlimited assembly code, up to
32KB of C code for HCS08/RS08 derivatives, up to 64KB of C code for V1 ColdFire derivatives and
up to 128KB of C code for V2-V4 ColdFire and Kinetis derivatives and up to 512KB of C code for
MPC56xx derivatives.
Once you have finished downloading and installing CodeWarrior, users can return to Downloading and Installing page .
8. Dev-C++

It is a full-featured IDE for C or C++ languages. For compilation, it uses MinGW port of GNU Compiler Collection (GCC) or any other GCC compilers. It is supported on Windows OS for Software Development.
Programming Languages Supported: C and C++
HOW TO DOWNLOAD :-
Comments
Post a Comment